分布式锁
前言
分布式项目中必然而然的肯定会接触到分布式锁,相比诸如限流、熔断、分布式锁等其他技术。分布式锁在分布式项目是肯定会遇到的。因为其他技术可能在你的项目使用人数不多,业务简单而不需要。但是分布式锁在业务上基本是必须处理的。
目前分布式锁主流的实现方案有:redis分布式锁、ZooKeeper分布式锁两种。当然还有其他,比如基础关系型数据库来做分布式锁也有。这里只讲这两个。
redis分布式锁
基本原理-RedLock
redis分布式锁,在redis官方叫RedLock。其实现也主要分为两个阶段。
加锁-RedLock
redis中加锁主要通过set命令来解决其中还用到了nx和px参数(在redis2.6.12版本后set命令增加了很多新的参数,所以理论上setnx、setex、psetex会被set命令取代,后续也不推荐使用以上命令,可能后续版本会被不推荐或者移除,具体可查看官网)来控制。
SET key my_random_value NX PX 30000
比如通过以上命令就可以获取锁,由于NX的特性只有在key不存在时才能设置成功保证了锁的独占性,而PX则保证了在锁的安全性,避免获取锁的客户端在崩溃后,锁能够自然释放掉。其中my_random_value可以设置为一个随机值,必须保证该值得全局唯一性
解锁-RedLock
解锁的过程就可以直接使用DEL命令来解决,但是为了保证加锁和解锁是同一个客户端,所以我们要校验一下my_random_value是否正确。这里可以为了保证其原子性可以使用Lua脚本来完成
1
2
3
4
5
| if redis.call("get",KEYS[1]) == ARGV[1] then
return redis.call("del",KEYS[1])
else
return 0
end
|
以上就是最基本的redis锁的原理
缺点
这种锁肯定也有缺点。在redis主从哨兵的环境中。比如我们在主服务器获取了锁。此时主服务宕机。由于redis主从复制的异步特性,该key值没有同步到从服务器。并且完成了选举,此时第二个客户端就可能直接在新的主服务器获取到锁。所以就可能存在两个客户端同时获取到锁。
所以我们在核心业务的逻辑处理中要自己去保证被加锁的代码块的幂等性,不会因为分布式锁的问题而导致出现核心业务受损。
不知道有什么完美的解决方案,对redis内部的架构不大了解。待定!
Redisson
Redisson是redis的一个java客户端。也是redis官网推荐的客户端(Spring-data-redis默认使用的Jedis),其中Redisson也对redis的分布式锁进行封装处理。比如对其支持可重复锁,公平锁等扩张,以便我们更好的使用Redis分布式锁。来简单看下Redisson的内部源码实现
这里首先要特别注意下由于Redisson的版本更迭比较快,我发现锁的内部实现代码。每个版本都有一些差异。基本原理都是一样的我用的SpringBoot所以版本也都一样。
Redisson Version : 3.11.3
Redisson SpringBoot start Version :3.11.3
Redisson分布式锁的基本使用
Redisson的分布式锁使用和Java中的ReentrantLock的使用是一样的。
1
2
3
4
5
6
7
8
9
10
11
12
| @Autowired
private RedissonClient redissonClient;
public void method() throws InterruptedException {
RLock lock = redissonClient.getLock("myKey");
try {
lock.lock();
lock.tryLock(1, TimeUnit.MINUTES);
}finally {
lock.unlock();
}
}
|
以上代码就是简单的lock使用。接下来来看下其源码实现
获取lock
首先在了解过ReentrantLock的实现上,在看其实现就会简单很多。
先看下RLock lock = redissonClient.getLock("myKey");这句主要做了什么。
1
2
3
4
5
6
7
8
9
10
11
12
13
14
15
16
| @Override
public RLock getLock(String name) {
return new RedissonLock(connectionManager.getCommandExecutor(), name);
}
public RedissonLock(CommandAsyncExecutor commandExecutor, String name) {
super(commandExecutor, name);
this.commandExecutor = commandExecutor;
this.id = commandExecutor.getConnectionManager().getId();
this.internalLockLeaseTime = commandExecutor.getConnectionManager().getCfg().getLockWatchdogTimeout();
this.entryName = id + ":" + name;
this.pubSub = commandExecutor.getConnectionManager().getSubscribeService().getLockPubSub();
}
|
Redisson加锁的实现
构造函数没有特别的,主要是获取Redis的连接的基本类。和一些默认的参数
lock获取完了,接下来看第二部加锁。
1
2
3
4
5
6
7
8
9
10
11
12
13
14
15
16
17
18
19
20
21
22
23
24
25
26
27
28
29
30
31
32
33
34
35
36
37
38
39
40
41
42
43
44
45
46
47
48
49
| public void lock() {
try {
lock(-1, null, false);
} catch (InterruptedException e) {
throw new IllegalStateException();
}
}
private void lock(long leaseTime, TimeUnit unit, boolean interruptibly) throws InterruptedException {
long threadId = Thread.currentThread().getId();
Long ttl = tryAcquire(leaseTime, unit, threadId);
if (ttl == null) {
return;
}
RFuture<RedissonLockEntry> future = subscribe(threadId);
commandExecutor.syncSubscription(future);
try {
while (true) {
ttl = tryAcquire(leaseTime, unit, threadId);
if (ttl == null) {
break;
}
if (ttl >= 0) {
try {
getEntry(threadId).getLatch().tryAcquire(ttl, TimeUnit.MILLISECONDS);
} catch (InterruptedException e) {
if (interruptibly) {
throw e;
}
getEntry(threadId).getLatch().tryAcquire(ttl, TimeUnit.MILLISECONDS);
}
} else {
if (interruptibly) {
getEntry(threadId).getLatch().acquire();
} else {
getEntry(threadId).getLatch().acquireUninterruptibly();
}
}
}
} finally {
unsubscribe(future, threadId);
}
}
|
接下跟下去详细看到尝试获取锁的方法
1
2
3
4
5
6
7
8
9
10
11
12
13
14
15
16
17
18
19
20
21
22
23
24
25
26
27
28
29
30
31
32
33
34
35
36
37
38
39
40
41
42
43
44
| private <T> RFuture<Long> tryAcquireAsync(long leaseTime, TimeUnit unit, long threadId) {
if (leaseTime != -1) {
return tryLockInnerAsync(leaseTime, unit, threadId, RedisCommands.EVAL_LONG);
}
RFuture<Long> ttlRemainingFuture = tryLockInnerAsync(commandExecutor.getConnectionManager().getCfg().getLockWatchdogTimeout(), TimeUnit.MILLISECONDS, threadId, RedisCommands.EVAL_LONG);
ttlRemainingFuture.onComplete((ttlRemaining, e) -> {
if (e != null) {
return;
}
if (ttlRemaining == null) {
scheduleExpirationRenewal(threadId);
}
});
return ttlRemainingFuture;
}
<T> RFuture<T> tryLockInnerAsync(long leaseTime, TimeUnit unit, long threadId, RedisStrictCommand<T> command) {
internalLockLeaseTime = unit.toMillis(leaseTime);
return commandExecutor.evalWriteAsync(getName(), LongCodec.INSTANCE, command,
"if (redis.call('exists', KEYS[1]) == 0) then " +
"redis.call('hset', KEYS[1], ARGV[2], 1); " +
"redis.call('pexpire', KEYS[1], ARGV[1]); " +
"return nil; " +
"end; " +
"if (redis.call('hexists', KEYS[1], ARGV[2]) == 1) then " +
"redis.call('hincrby', KEYS[1], ARGV[2], 1); " +
"redis.call('pexpire', KEYS[1], ARGV[1]); " +
"return nil; " +
"end; " +
"return redis.call('pttl', KEYS[1]);",
Collections.<Object>singletonList(getName()), internalLockLeaseTime, getLockName(threadId));
}
|
在了解key[1] ARGV[1] ARGV[2]是什么后很简单了。
实际上他为了一个map结构的数据。
key - 锁的名称
filed - 随机字符串+线程ID 值为1
value - 线程ID 会随着的递增来实现可重入锁
加锁基本就已经完成! 接着来看下解锁
Redisson解锁的实现
1
2
3
4
5
6
7
8
9
10
11
12
13
14
15
16
17
18
19
20
21
22
23
24
25
26
27
28
29
30
31
32
33
34
35
36
37
38
39
40
41
42
43
44
45
46
47
48
49
50
| @Override
public RFuture<Void> unlockAsync(long threadId) {
RPromise<Void> result = new RedissonPromise<Void>();
RFuture<Boolean> future = unlockInnerAsync(threadId);
future.onComplete((opStatus, e) -> {
if (e != null) {
cancelExpirationRenewal(threadId);
result.tryFailure(e);
return;
}
if (opStatus == null) {
IllegalMonitorStateException cause = new IllegalMonitorStateException("attempt to unlock lock, not locked by current thread by node id: "
+ id + " thread-id: " + threadId);
result.tryFailure(cause);
return;
}
cancelExpirationRenewal(threadId);
result.trySuccess(null);
});
return result;
}
protected RFuture<Boolean> unlockInnerAsync(long threadId) {
return commandExecutor.evalWriteAsync(getName(), LongCodec.INSTANCE, RedisCommands.EVAL_BOOLEAN,
"if (redis.call('hexists', KEYS[1], ARGV[3]) == 0) then " +
"return nil;" +
"end; " +
"local counter = redis.call('hincrby', KEYS[1], ARGV[3], -1); " +
"if (counter > 0) then " +
"redis.call('pexpire', KEYS[1], ARGV[2]); " +
"return 0; " +
"else " +
"redis.call('del', KEYS[1]); " +
"redis.call('publish', KEYS[2], ARGV[1]); " +
"return 1; "+
"end; " +
"return nil;",
Arrays.<Object>asList(getName(), getChannelName()), LockPubSub.UNLOCK_MESSAGE, internalLockLeaseTime, getLockName(threadId));
}
|
Redisson的加锁和解锁基本完成。只需要简单的记住它所维护的map数据结构即可很好的记住它的原理
Redisson中的看门狗
Redisson有一个看门狗的角色特别说明下,就是前面说的那个定时任务
首先通过前面的原理已经知道Redis在加锁的时候是会设置一下key的时间的。假如在持有锁的客户端在设置的时间内依然正在执行中,那么就很有可能锁被其他客户端拿到造成两个客户端同时获取到锁。为了解决这个问题才引入了看门狗这个角色。它主要监控获取锁的线程如果该线程一直在运行中,它可以为这个锁的时间来续约。默认是每次续约30000毫秒。
这个角色具体有兴趣可以自己看下源码。
ZooKeeper分布式锁
ZooKeeper的分布式锁首先我们要知道ZooKeeper的基本原理和内存模型。具体可以看我的另外一篇文章,这里不多做介绍了!
基本原理-Zookeeper
加锁-ZooKeeper
加锁主要是通过zookeeper来创建一个临时顺序节点。然后检查自己的节点是否为顺序中最小的那一个,如果不是则监听自己上一个顺序的节点等待被唤醒
实际就是类似维护了一个FIFO的队列,然后依次监听自己的上一个节点。就像链式结构一样
这里的临时节点可以保证,自己掉线后,由zookeeper来删除节点,最后通知下一个节点。保证链式不断。
解锁-ZooKeeper
解锁就比较简单了。删除自己的节点即可。通过zookeeper的监听机制来通知其他节点
Curator
既然Redis推荐Redisson,那么ZooKeeper肯定推荐的实现代码!这里推荐curator客户端。同时是基于ZooKeeper做一些开发。可推荐使用该客户端。因为原生客户端不大好用,比如由于ZooKeeper的watch绑定机制每次触发一次就会失效需要重新绑定。这里该客户端已经帮我们实现了动态绑定。避免我们写代码时忘记。详细使用可以自己查看官网了!
Curator的基本使用
这里用的版本是2.8.0,其他版本的源码可能有些许出入。
1
2
3
4
5
| <dependency>
<groupId>org.apache.curator</groupId>
<artifactId>curator-recipes</artifactId>
<version>2.8.0</version>
</dependency>
|
这里简单看下使用的代码。非常简单。上面那部分代码可以集成在Spring中。统一使用CuratorFramework即可
1
2
3
4
5
6
7
8
9
10
11
12
13
14
15
16
| ExponentialBackoffRetry retry = new ExponentialBackoffRetry(1000, 3);
CuratorFramework framework = CuratorFrameworkFactory.builder()
.connectString("192.168.72.253:2181,192.168.72.253:2182,192.168.72.253:2183")
.sessionTimeoutMs(50000)
.connectionTimeoutMs(50000)
.retryPolicy(retry)
.namespace("duteliang")
.build();
framework.start();
InterProcessMutex interProcessMutex = new InterProcessMutex(framework,"/zl/lock/name");
try {
interProcessMutex.acquire();
} finally {
interProcessMutex.release();
}
|
Curator加锁的实现
简单看下internalLock的内部实现
1
2
3
4
5
6
7
8
9
10
11
12
13
14
15
16
17
18
19
20
| private boolean internalLock(long time, TimeUnit unit) throws Exception {
Thread currentThread = Thread.currentThread();
LockData lockData = threadData.get(currentThread);
if ( lockData != null ) {
lockData.lockCount.incrementAndGet();
return true;
}
String lockPath = internals.attemptLock(time, unit, getLockNodeBytes());
if ( lockPath != null ){
LockData newLockData = new LockData(currentThread, lockPath);
threadData.put(currentThread, newLockData);
return true;
}
return false;
}
|
其中重点就是internals.attemptLock获取锁这个方法!继续看源码
1
2
3
4
5
6
7
8
9
10
11
12
13
14
15
16
17
18
19
20
21
22
23
24
25
26
27
28
29
30
31
32
33
34
35
36
37
38
| String attemptLock(long time, TimeUnit unit, byte[] lockNodeBytes) throws Exception {
final long startMillis = System.currentTimeMillis();
final Long millisToWait = (unit != null) ? unit.toMillis(time) : null;
final byte[] localLockNodeBytes = (revocable.get() != null) ? new byte[0] : lockNodeBytes;
int retryCount = 0;
String ourPath = null;
boolean hasTheLock = false;
boolean isDone = false;
while ( !isDone ){
isDone = true;
try{
ourPath = driver.createsTheLock(client, path, localLockNodeBytes);
hasTheLock = internalLockLoop(startMillis, millisToWait, ourPath);
}catch ( KeeperException.NoNodeException e ){
if ( client.getZookeeperClient().getRetryPolicy().allowRetry(retryCount++, System.currentTimeMillis() - startMillis, RetryLoop.getDefaultRetrySleeper()) ){
isDone = false;
}else{
throw e;
}
}
}
if ( hasTheLock ){
return ourPath;
}
return null;
}
public String createsTheLock(CuratorFramework client, String path, byte[] lockNodeBytes) throws Exception {
String ourPath;
if (lockNodeBytes != null) {
ourPath = client.create().creatingParentsIfNeeded().withProtection().withMode(CreateMode.EPHEMERAL_SEQUENTIAL).forPath(path, lockNodeBytes);
} else {
ourPath = client.create().creatingParentsIfNeeded().withProtection().withMode(CreateMode.EPHEMERAL_SEQUENTIAL).forPath(path);
}
return ourPath;
}
|
这一步主要就是两步
- 创建临时顺序节点
- 循环对顺序节点和自己进行检查,来判断自己是否可以获取锁
接下来看第二部的代码。
1
2
3
4
5
6
7
8
9
10
11
12
13
14
15
16
17
18
19
20
21
22
23
24
25
26
27
28
29
30
31
32
33
34
35
36
37
38
39
40
41
42
43
44
45
46
47
48
49
50
51
52
53
54
55
56
57
58
59
60
61
| private boolean internalLockLoop(long startMillis, Long millisToWait, String ourPath) throws Exception {
boolean haveTheLock = false;
boolean doDelete = false;
try {
if (revocable.get() != null) {
client.getData().usingWatcher(revocableWatcher).forPath(ourPath);
}
while ((client.getState() == CuratorFrameworkState.STARTED) && !haveTheLock) {
List<String> children = getSortedChildren();
String sequenceNodeName = ourPath.substring(basePath.length() + 1);
PredicateResults predicateResults = driver.getsTheLock(client, children, sequenceNodeName, maxLeases);
if (predicateResults.getsTheLock()) {
haveTheLock = true;
} else {
String previousSequencePath = basePath + "/" + predicateResults.getPathToWatch();
synchronized (this) {
try {
client.getData().usingWatcher(watcher).forPath(previousSequencePath);
if (millisToWait != null) {
millisToWait -= (System.currentTimeMillis() - startMillis);
startMillis = System.currentTimeMillis();
if (millisToWait <= 0) {
doDelete = true;
break;
}
wait(millisToWait);
} else {
wait();
}
} catch (KeeperException.NoNodeException e) {
}
}
}
}
} catch (Exception e) {
doDelete = true;
throw e;
} finally {
if (doDelete) {
deleteOurPath(ourPath);
}
}
return haveTheLock;
}
private synchronized void notifyFromWatcher(){
notifyAll();
}
|
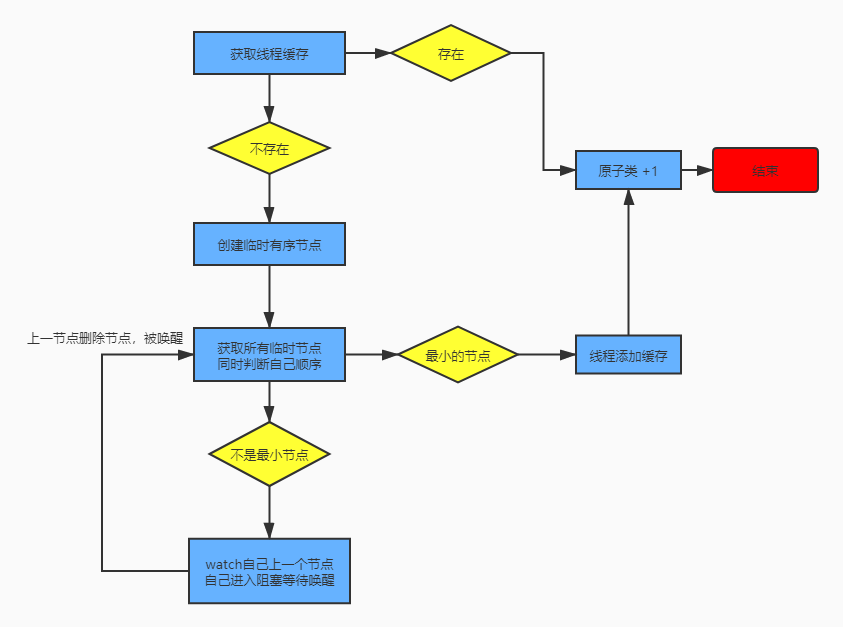
从代码可以看出,其主要逻辑
- 获取所有顺序节点
- 判断自己是否为顺序中最小的那个节点,是就获取锁
- 不是则获取自己上一个节点,然后watch它。等待唤醒
这里为了便于理解可以参考一下下面的逻辑图
Curator解锁的实现
解锁就是比较简单了。就是删除节点。不多介绍。
1
2
3
4
5
6
7
8
9
10
11
12
13
14
15
16
17
18
19
20
21
22
| public void release() throws Exception {
Thread currentThread = Thread.currentThread();
InterProcessMutex.LockData lockData = threadData.get(currentThread);
if (lockData == null) {
throw new IllegalMonitorStateException("You do not own the lock: " + basePath);
}
int newLockCount = lockData.lockCount.decrementAndGet();
if (newLockCount > 0) {
return;
}
if (newLockCount < 0) {
throw new IllegalMonitorStateException("Lock count has gone negative for lock: " + basePath);
}
try {
internals.releaseLock(lockData.lockPath);
} finally {
threadData.remove(currentThread);
}
}
|
总结
这里基本讲完了Redis和ZooKeeper分布式锁的原理和实现。当然了解原理后可以自己去滚轮子,但是要注意很多细节部分。推荐还是直接使用上面的框架。
那么Redis和ZooKeeper分布式锁,哪个好一点了。
我认为首先两者在性能上面都是完全能够在生产环境使用的,两者之间的主要区别在于:
- Redis分布式锁上面已经讲过在主从集群环境中,有一个缺点。就是有可能两个客户端同时获取到锁,ZooKeeper就不存在这种。这主要是两者设计理念所造成的。就是我们常说的CAP原则,ZooKeeper保证的是CP(容错性和一致性),而redis保证的是AP(容错性和可用性)。具体可以去了解一下CAP的设计原则。
- ZooKeeper在锁等待时会阻塞线程,不需要通过循环来解决。这也是由于ZooKeeper天然提供watch机制所带来的好处
- ZooKeeper由于CP所带来的强一致性,性能没有redis好,同时由于ZooKeeper的实现中频繁的删除添加节点也有影响。但是ZooKeeper并不慢,只是与Redis比较而言
所以如果能使用ZooKeeper我还是推荐使用ZooKeeper,但是ZooKeeper在项目中很多时候是作为注册中心来使用(比如dubbo),如果你的项目没有使用ZooKeeper,那么也可以使用Redis来做分布式锁,毕竟大部分项目都会使用Redis来做缓存。
参考文档
redis官网set命令说明
Distributed locks with Redis
分布式锁之Redis实现
curator-lock-document